Git Cheatsheet
Git Basics (Just Enough to Get Going)
Git is the industry-standard version control system, and knowing your way around the command line is a fundamental skill in any tech career. The GitHub web interface is fine for viewing files, but for real work, the command line is faster, more powerful, and what professionals use daily.
This guide covers the essential commands needed to manage this portfolio project on your local machine.
The Core Concept: A Three-Stage Process
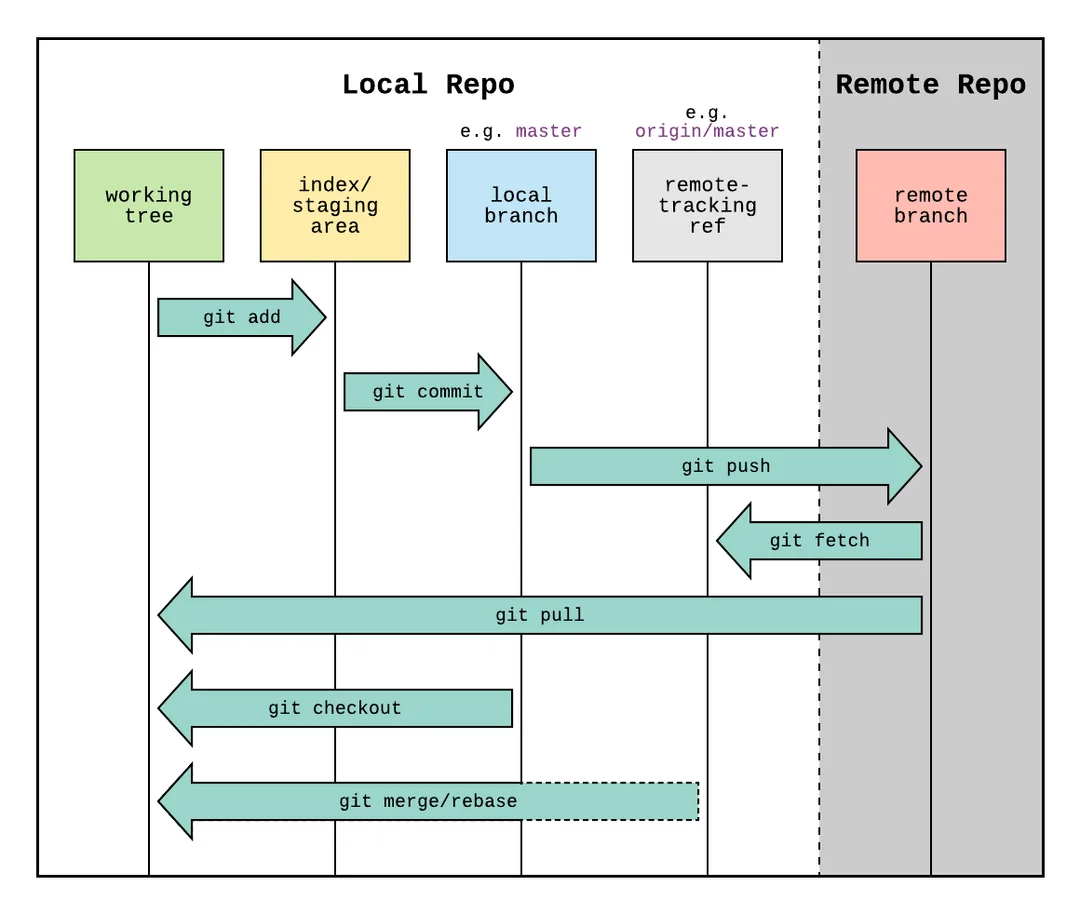
Working with Git isn’t a single “save” action. It’s a deliberate, three-stage process that gives you complete control over your project’s history.
- Working Directory: This is your project folder on your computer. Any file you add, delete, or modify exists here. It’s your messy workshop.
- Staging Area (The “Index”): This is the waiting room. After you’ve made changes, you move the specific files you want to save into the staging area. This lets you group related changes together into a single, clean “snapshot.”
- Local Repository (
.git): This is your project’s history book. When you “commit,” you take everything in the staging area and permanently save it as a new snapshot (a “commit”) in your local repository. This snapshot has a unique ID and a descriptive message.
The Essential Workflow Commands
This is the cycle you will repeat every time you work on your portfolio.
1. git pull - Get the Latest Version
Always run this command first before you start working. It connects to GitHub and downloads any changes that might have been made since you last worked, ensuring your local copy is up to date.
# In your project's root directory
git pull
2. git status - Check Your Work
This is your most-used command. It tells you the current state of your repository:
- Which files have been modified? (Shows up in red)
- Which files are new and untracked?
- Which files are in the staging area, ready to be committed? (Shows up in green)
git status
3. git add - Stage Your Changes
This command moves your changes from the Working Directory to the Staging Area.
# To stage a single file
git add path/to/your/file.md

# To stage ALL modified and new files in the project (most common)
git add .
(The . is a wildcard that means “everything in this current directory and subdirectories”.)
4. git commit - Save Your Snapshot
This command takes everything in the Staging Area and saves it permanently to your Local Repository with a descriptive message.
A good commit message is crucial. It should be a short, imperative summary of what you did.
- Good:
feat: Add git-basics tutorial page - Good:
fix: Correct navigation link in sidebar - Bad:
updated files
git commit -m "Your descriptive message here"
5. git push - Upload to GitHub
A commit only saves the changes to your local machine. git push uploads your committed changes from your local repository to the remote repository on GitHub, making them public and triggering your site to rebuild.
git push
Summary: The Full Workflow Cycle
# 1. Make sure you're up to date
git pull

# 2. (Do your work... edit files, add images, etc.)

# 3. See what you've changed
git status

# 4. Stage all your changes for the next snapshot
git add .

# 5. Save the snapshot with a clear message
git commit -m "feat: Add content for the Cyber Defense project page"

# 6. Upload your new snapshot to GitHub
git push
Mastering this cycle is a huge step forward in your technical journey. It gives you the confidence to experiment, knowing you can always track your changes and manage your project like a professional. ```